How I create things in my kiln, and what eventually happens to what I create...

Glass goes in the kiln, and glass comes out, quite altered! Sometimes it works, sometimes it doesn't. That's what happens in life.

Sunday, December 11, 2011

Vodka bottle

Phil and I went to a major liquor store today and asked if they had any empty wine bottles. They gave us a case of empties. (Why would a liquor store have empty wine bottles???) On the way out of the store I spied a beautiful cobalt blue bottle of vodka and bought it--for the bottle. Since we don't drink vodka, at our request the store clerk poured the vodka into an empty water jug. I think I now understand why there were empty wine bottles at the liquor store.  


Below are some of the wine bottles I've slumped. I painted snowflakes on a couple of them. 


Sunday, December 4, 2011

The glass you use to paint on makes a huge difference.

This is the unfired piece--skull painted with Reusche paint on the uncoated side of a 96 COC 4"x4" piece of dichroic glass.  

Here is the fired (fused) piece, with little or no deterioration in the painted surface. The painted surface was placed on a larger 96 COE piece of white iridescent glass. The firing schedule was for fusing. 
My near sister, Diane, had her first design project choosing the layout for the background glass. She and I spent some time Saturday playing with dichro squiggles, dichro stringers and 96 COE chips.  We were looking for a design that would continue the electrified look beyond the dichroic square. Diane chose the squiggles.

Below is the slumped dish, back lit.  I learned an important lesson with this piece. Dichroic glass does not slump well.  It loses its smoothness.


It feels rough to the touch; gritty in fact, and any image clarity is hidden behind the crazing. The white iridescent glass is smooth on the inside of the bowl.

The whole object shrunk quite a bit, to nearly three fourths the size of the mold. 

I spent quite a bit of time and effort creating this piece and I learned a lot in the process. Even without house guests it took me two days to create the painting, a half day to fuse the painting onto the glass and a half day to slump it.

Monday, November 28, 2011

As promised.

Experimenting with glass colors is fun. Whenever I get it right, I rejoice. Sometimes the outcome looks a little weird, though, as happened in this tile. The colors I thought would be amazing, really weren't because I picked a crummy background color to work with. That's what happens when you don't have enough of what you want and "settle" for something else just to get the idea out of your mind and onto glass. I'm not Happy. (So, which Dwarf are you, then?) Also, using Glassline paint is quick and easy, but the color vibrancy leaves a lot to be desired

My favorite part of the tile painting is the fish skeleton on the cat's forehead. I'm tired of day of the dead stuff. Dichroic glass is much more exciting! Look at this combo. I know. It's a skull. But GOSH!

This is so simple, and actually quite beautiful in a frightening sort of way. I put a photocopied skull behind clear glass and plopped a piece of electric clear dichro over it.  Makes me wonder what would happen if I made a decal out of the photocopy and then tack fused it all together. Decals "brown out" into sepia tones during firing, so the end result wouldn't be as startling. Hand painting the skull onto glass using the traditional method with Reusche paint, and then firing the dichro over it would work and it would look just like this.

Sunday, November 27, 2011

"Day of the Dead" cat tile, pre-fire

It's interesting how a three dimensional piece of art can actually have another dimension. The tile I'm making has the outline painting sandwiched between two layers of glass, which adds depth. Now that I've painted the color over the outline, it looks like it has another dimension. Look into the cat's spiral eye.

There are tiny little bubbles caught between the layers (about the size of small champagne bubbles). I don't think you can see them from this photo; they show up below the ears and around the whiskers.

With the color layered on the outside of the glass, the outline beneath the clear glass, and the bubbles between the layers, it looks like the cat is under water.

This picture was taken prior to firing. When it comes out of the kiln, I'll snap another shot. The colors should be vibrant. The flower on top of the head is deep red with yellow highlights. The leaves are varying shades of deep green to yellow green. The ears are pink with green flowers. The nose is pale green and the lower jaw is dark blue.

Wednesday, November 23, 2011

Monday, November 14, 2011

Strange yet wonderful glass combination

While I was firing things in the kiln on Sunday, I fused together two pieces of glass and this is what came out.  The top glass is called "royal glass" and the bottom glass is green iridescent.  Both are 90 COE. The royal glass is actually glue chip coated with copper colored paint that goes through a fusing process when fired. The combination reminds me of weathered copper.

Sunday, November 13, 2011

Day of the really dead?

Today I made this skull coaster .

This is a 5.5" x 5.5" coaster made by fusing clear glass over white irridescent glass. I fired the dichro wavy strips at the same time I fused the two pieces together at 1450 df, then drew the skull (Glassline paint again) and fired the image and slumped it in another firing at 1350 df.

It took most of the morning to draw this guy.  He/she has a nice smile, don't you think?

Friday, November 11, 2011

Day of the Dead dish

It's going to rain today. Rather than start something big I might not be able to get in the kiln before the raindrops start, I thought I'd work on a small dish to sell at a small boutique a friend and I are having at work, towards the end of November.

It's 5"x 5", fused clear glass over white iridescent glass. Since it is painted on the clear side, the design creates a shadow on the white base glass. Sweet, huh? I added some millefiori slices and an aqua blue glass pebble on her eye. Yes, they are glued on because they were an after-thought, but this dish wasn't meant to be "used" as a dish (unless you put a bar of soap in it).

Not to worry. If the glued on pieces come off, there will still be decorative paint melted into the glass. I used Glassline Pens for the outline and color, fired it in two firings--one to set the outline of the design, and the other to fire the colors and slump the dish. I think I'll charge $5000.00 for it (not really).  It WAS a lot of work, though.

Saturday, October 29, 2011

A.V. Cabinet finally has a door.

Finally, the audio-visual cabinet is finished. What was once a laundry closet is now full of A.V. equipment and the door is installed.  Does it look familiar? It should! You have been part of the construction. If you are anything like me, finishing a project brings huge satisfaction. The fish give a tactile perception because of the raised the painting on the scales and the slickness of the glass. Did I mention that I'm glad this is finished?
Phil made the door for it last weekend. I spent today filling the holes with wood putty and priming and painting it today.  Did I tell you that I'm happy it's finished?
Phil looks rather small compared to the panel...maybe the photographer is a little biased. So much concentration in one spot nearly caused an electrical black-out. Frankly (did I already mention that I'm very glad this is finished?) it looks good. I don't have to worry about the panel getting damaged (I think it's even earthquake proof).

Tuesday, October 25, 2011

McCabe Coat of Arms

 I think the helmet is my favorite part of the McCabe coat of arms.  It was a blast painting it.
 The salmon (right) was another kick to paint.  I didn't know salmon had flat backs and dumpy tummies.  This actually looks more like a trout posing as a salmon.


I had fun with the vines, too.  Curlicues with shadowing is fun.  Would I do this again?  In a heartbeat!!!

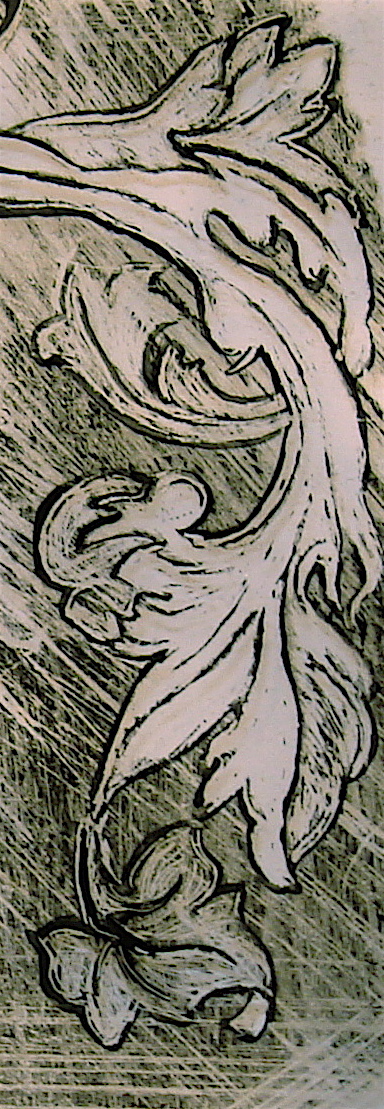
This is the very first time I've tried a by-the-book coat of arms painting on clear glass.  There are so many things that went right with it that I will overlook the "wrong" stuff, for now.  I wanted it to look very old, rubbed out, scratched through.  I might have gone a bit overboard on the base coat texture.  To me, it looks more like an etching, or a wood cut stamped on paper.  I placed the 5" x 5" piece of glass on top of a pale white ceramic mold (see the little air vent hole in the middle of the wavy part?) so I could get a constant background for photography.

Friday, October 14, 2011

panel in daylight

 As promised, here are two daylight pictures--one taken inside (right) and one take outside (left). I like the one on the left, better than the one on the right, and the one on the right will be the lighting we try to achieve when we put the panel into the cabinet door. The pink lotus blossom will be pinker because the vagaries of the camera don't really do the panel justice.

Thursday, October 13, 2011

Koi panel is "all done," as some folks say!

The koi panel is "all done"(as some folks say when they've completed a task). I finished leading and soldering it tonight, after work. The next stage is to get Phil to build a cabinet door frame for it.  He's out fly fishing today.  If he had stayed home, he could have had flattened koi instead.  Not as tasty, though.

The picture was taken at night.  I'll take another one tomorrow morning when it's sunny out (and over 100 df AGAIN).

Sunday, October 9, 2011

Ready to begin construction

Everything has been foiled. Where there isn't foil there will be lead came. The perimeter edges will be finished in zinc. Construction will have to wait for a couple of weekends (too late to begin tonight--Sunday). The exterior of the house is being painted next weekend and my work bench is in the open. I don't want to have the panel covered in terra cotta colored texture coat.

Saturday, October 8, 2011

 The koi are finished, fired and I'm ready to begin building the panel.  Glassline stained glass paint works just fine.  The gray scales fired out to a lovely pale gray, unobtrusive, and that was what I was worried about.
Here is a close up of fins and scales...

and below, a close up of the female fish's eyes and mouth.

Thursday, October 6, 2011

The Right Stuff

I finally got the glass for the koi panel. It's taken a while to paint the scales.  Very tedious. The paint is not the usual Reusche, but Glassline, and it is best fired at 1500 df which definitely makes the glass have a different visual texture--smoother and shinier after test firing.  Firing that hot also makes the edges of the fired piece rounder.


The scales may not show up in direct light because they are painted gray and will fire quite pale. However, the aim is to hint at the scales, not have them be obvious.  The eyes and mouth and whiskers, however, are painted with Glassline black over the pale gray.  If it all works out I'll be one happy camper.  Keep your fingers crossed!

Sunday, September 18, 2011

No one expects the Spanish Inquisition!

No UPS deliveries on Sunday, so no orange glass. I had to get my glass-cutting fix by re-doing the bottom of the panel. I wasn't happy with the orange-green stuff I had used, so out it went (most of it) and I got out some glass I had been terrified to cut. See all of those ripples? They are very deep and breaking this glass, once it has been scored, is not easy. This glass has a mind of its own. It likes to shatter at unexpected times, or run any which way except the way I scored it.

I cut, and I cursed, and I re-cut it, until I finally gave in and made mostly straight cuts. The finished pieces were held to the grinder to get the curves I wanted, and to grind a bevel onto the back of each piece so I could foil/lead it.  I used part of the orangey green glass for reasons only known to my mind alone.

In my box of tricks I found an amethyst geode slice, and ground THAT down, as well.  No one expects the Spanish Inquisition, and nothing is safe from my grinder!  Nothing.

Thursday, September 15, 2011

Hooked on Uroborus glass.

I'm still waiting for the right shade of orange to come along for the koi in my panel.  Gee whiz!  How many different shades of orange ARE there?  Obviously my eye hasn't seen one I like yet, and my glass bins runneth over with every shade but the right one.


In the meantime, the lily pads are working out well, and even though I plan on painting and firing the eyes, scales, and fin spines whenever the right shade of orange happens to get to my front door, I've indicated the eyes with green glass globs which make the fish look drugged out...koi on crack. They are dead-in-the-pan-looking fish right now. Maybe it's the expression on their faces. I have yet to meet a fish with a sense of humor. The snail is a fossil (like me!) but I love her anyway.


The bottom of the pond is pumpkin/green Uroborus (I love this stuff) and the top of the geode slice is where a line of lead begins. This will run "behind" the fish up to one of the lily pads. There will be other stem-like lead lines running vertically in the panel as well. The water glass came for the top of the panel, but my day job keeps me from getting home in time to cut glass.

Tuesday, September 6, 2011

Koi panel begins

While I'm waiting for some new glass molds to arrive, I though I'd start on the koi panel for the A.V. cabinet door.  I'm using some gorgeous teal blue Uroborus mottled glass for the water.  I found a small fossil at a gem show and thought I'd add it, climbing up a water plant.  The glass for the koi, the bottom and top of the panel should arrive soon.  This panel will be a mixture of lead and copper foil.  It is not entirely my own design...sigh.  Drawing fish is not my forte.


Saturday, August 27, 2011

About my pension plan...

poppy dish
It is over 100 degrees today, so why not add to the heat by firing up the kiln? The poppy dish was yet another study in "think about it a little longer." This was a three-stage firing when it should have been two stages--one to fuse, and one to slump. The fusing went well.

There are two molds involved in the slumping process. The fused red flower with a black center is slumped on a ring mold that is set on top of a base mold (green on clear part) and both parts drop into shape. The top of the base and the bottom of the slumped flower meet and fuse during the second firing, at 1325 df for 40 minutes. Just like some marriages, though, this joining didn't work out the first time around. It took a third firing at a higher temperature, 1350 df for another 30 minutes to get the two parts to agree.

What I didn't think about (measure everything) is that the base mold is wider in diameter than the the top of the cone of the flower (ring mold).

The ring mold (way cheaper in cost than the base mold) had to be destroyed.  And to think I wanted to do this for a living when I retire. My pension plan better grow like mad at this rate.

Tuesday, August 23, 2011

Repaired bear panel

I don't know about you, but I'm worn out with this bear panel.  It is repaired and ready for installation--again.

Sunday, August 14, 2011

I'm learning.

Wolf-bear?  Tiger-Bear?
I've repainted the bear's head and added paint to the neck this time, so hopefully the bear will not look like it needs a shave.  The boulders are in the kiln (again) and this time I added some grass and lichen--grass in dark green mixed with yellow and black, and lichen in yellow mixed with light umber.  I even managed to blend grass and lichen onto the already fired boulders that I could save.  So, all was not lost--I hope.


Bear and boulders.  I'm still learning.

Friday, August 12, 2011

Pride Goeth Before Fall

As I was sitting here at work, waiting for my lawyer boss to come claim his new medicine cabinet door front, which I had propped against the upper shelf on my desk counter (with the under shelf lamp lighting it softly from behind), it suddenly toppled forward and fell to the floor.  The boulders are broken, bear's face is broken, side, top and bottom panels are broken, a part of the smaller tree broke (if a tree falls in the forest and no one is around to hear it, does it make a noise?  You can bet I MADE A NOISE!), and the sunniest ray in the side panel cracked in half.  Oh, and the small portion of the lake shattered. 

I get to do this panel all over, from creating new pieces to replace the old, to cleaning off and refoiling and soldering the entire project.  What this reminds me of is the time I made a huge unicorn panel for a doctor in Tulsa, OK, who wanted to used it as a coffee table top.  I had propped the finished piece against the attic door.  When the front door closed that day, the air pressure suddenly changed in the house.  This caused the attic door to blow off the hinges and crush the panel against the floor.  The pins in the hinges hadn't been replaced after a certain someone worked on the door earlier that day.

Moral of the story.  Stop propping up stuff that's breakable.

Friday, August 5, 2011

Medicine cabinet door panel is finished AND IT FITS!!!

Oh My Gosh!  I soldered the panel and lo and behold, it fits inside the medicine cabinet door frame.  I had to adjust several pieces to get there; and after lots of hard work the piece is finished.  Below are some pictures (of course).

soldered, with light behind it
with no light behind it
It's framed!  Yippee!
It looks entirely different from the backside.  It's really interesting to use the "wrong" side of glass facing the viewer.  The first mountain in the lake is actually wrong-side-out.  The right side has small glass stringers imbedded in it, which gives the hill an interesting texture.  The "wrong side" is what I used facing the viewer when the door is shut.  I liked the color scheme better.
view from the backside of the glass

Sunday, July 31, 2011

Copper foiled center panel
Today I finished foiling the interior panel of the medicine cabinet door.  I have to cut out and foil the long side and top strips sometime this week.  I hope to have this completed by next weekend. Painting the pile of boulders turned into a "do it twice" deal.  Since you can't scrape paint off of glass once it is fired, you had better be sure you A) know what you are doing and B) like what you have done the first time.  I didn't have A or B in hand for the first firing, and that piece is now in the trash.  I still didn't quite have A in hand the second time around, but I think I like it!  Besides painting and firing it with softer colors (browns and blue-grays) I lowered the fire temp a little.  That seemed to keep the glass from devitrifying.

Monday, July 25, 2011

"Sunrise at Big Bear Lake"

 I finished cutting the interior panel glass today and will paint the detail on the boulders (gray glass lower left) once the Reusche paints I ordered arrive.  I can go ahead and outline the rocks, but the colors I want to use for lichen, shading, etc., are not only umber and black...they are faded teal green, dark mossy green, and pale yellow mixed with a tinge of green.  The perimeter glass is a very pale Spectrum caramel and white swirl, and the corners will be Uroborus mottled dark teal swirled with dark green and pale teal.  My one fear is that when I start foiling the pieces, the dimensions will change (and yes, I used foil shears to cut out the pattern) because no matter how careful I am cutting out the pieces, my windows seem to grow!